Incoming materials account for up to 50% of final product quality defects (NexPCB Knowledge Base). That figure points to where quality problems begin, and it asks a harder question: if your inspection gates only exist at fixed checkpoints, what is happening to quality between those checkpoints?
Most plants run product quality inspection at defined stages. Incoming check. Mid-line audit. Pre-shipment review. Final sign-off. The logic holds. The structural gap is that gate-based inspection only catches defects when someone is present to check. This article gives you the complete checklist for all four stages and explains the one monitoring approach that covers what manual gates cannot.
Product quality inspection is the structured verification of materials, components, and finished goods at defined stages: IQC (incoming), IPQC (in-process), pre-shipment, and final release. Each stage uses different criteria, sampling methods, and acceptance thresholds to prevent defects from reaching downstream operations or customers.
What Product Quality Inspection Covers and Why It Is Structured in Stages
The four-stage model is not an industry convention to follow without understanding. Each stage exists because the same defect found later costs a fraction more to fix, every single time.
Incoming Quality Control (IQC) verifies raw materials and components before they enter production. In-Process Quality Control (IPQC) checks work-in-progress at defined control points during assembly. Pre-Shipment Inspection (PSI) validates completed goods against purchase specifications before packaging and dispatch. Outgoing Quality Control (OQC), also called final release, is the formal sign-off that all prior inspection evidence has been reviewed and shipment meets acceptance criteria.
The cost logic is what makes the four-stage model worth running strictly. A defect caught at IQC costs roughly 1x to resolve: reject the incoming lot, raise a supplier NCR, and reorder clean stock. That same defect found at final release costs 10x or more: production time wasted on nonconforming assemblies, rework across finished goods, and the possibility of a customer chargeback or recall. McKinsey manufacturing quality data supports the same 1:10 escalation ratio across mature manufacturing operations.
AI-based continuous monitoring delivers the highest marginal impact in the IPQC-to-OQC window. Manual gate checks at fixed intervals cannot detect process drift that accumulates gradually between inspection visits. The remaining sections cover what each checklist stage requires and what closes that gap.
Stage 1 Checklist: Incoming Quality Control (IQC)
Before a single component enters your production line, IQC must verify five things: that the material is what the supplier says it is, that it meets specification, that the quantity and documentation are correct, that any nonconformances are recorded, and that your supplier scorecard reflects actual performance. Running a rigorous product quality inspection at this stage is the single highest-impact action a quality team can take.
This is product quality control testing at its most upstream point. A defective fastener that passes IQC because sampling was insufficient produces nonconforming assemblies across an entire production run. Catch it here or pay compound interest on the error downstream.
- Step #1: Verify supplier quality records and Certificate of Analysis (CoA) against purchase specification before any lot enters the facility. Reject any shipment missing documentation without exception.
- Step #2: Sample the incoming lot using AQL per MIL-STD-105E or ISO 2859-1. Select sampling level based on lot size, component criticality, and supplier history. Do not default to the same AQL level for every supplier.
- Step #3: Run dimensional inspection against technical drawings using calibrated instruments, recording results as pass/fail against the AQL acceptance number. Add visual inspection for surface defects, marking, and packaging condition, and a functional spot-check for any component that must perform at assembly.
- Step #4: Document all nonconformances and raise an NCR with the supplier. Set a defined SLA for supplier response and corrective action. A verbal fix-promise is not a substitute for a written CAPA.
- Step #5: Update the supplier scorecard with the incoming defect rate for this lot. Flag any supplier trending above 1% defect rate across three consecutive lots for formal supplier development review.
- Step #6: Place any lot exceeding the AQL acceptance number on hold or in quarantine. Do not allow partial use of quarantined lots without documented risk acceptance signed at quality manager level.
- Step #7: Feed IQC findings into the IPQC risk weighting for the production run using that component. A lot that passed at AQL 4.0 carries more production risk than one that passed at AQL 1.0.
Named Framework: IQC Risk-Weighting Protocol
Score each incoming lot on a 1-5 scale across three dimensions to determine the appropriate inspection depth. Sum the three scores and apply the interpretation below.
IQC Risk-Weighting Protocol scoring matrix. Score interpretation: 3-7 = full 100% inspection required; 8-11 = standard AQL sampling; 12-15 = reduced sampling permitted. Review any single dimension scored 1 individually regardless of total.
Stage 2 Checklist: In-Process Quality Control (IPQC)
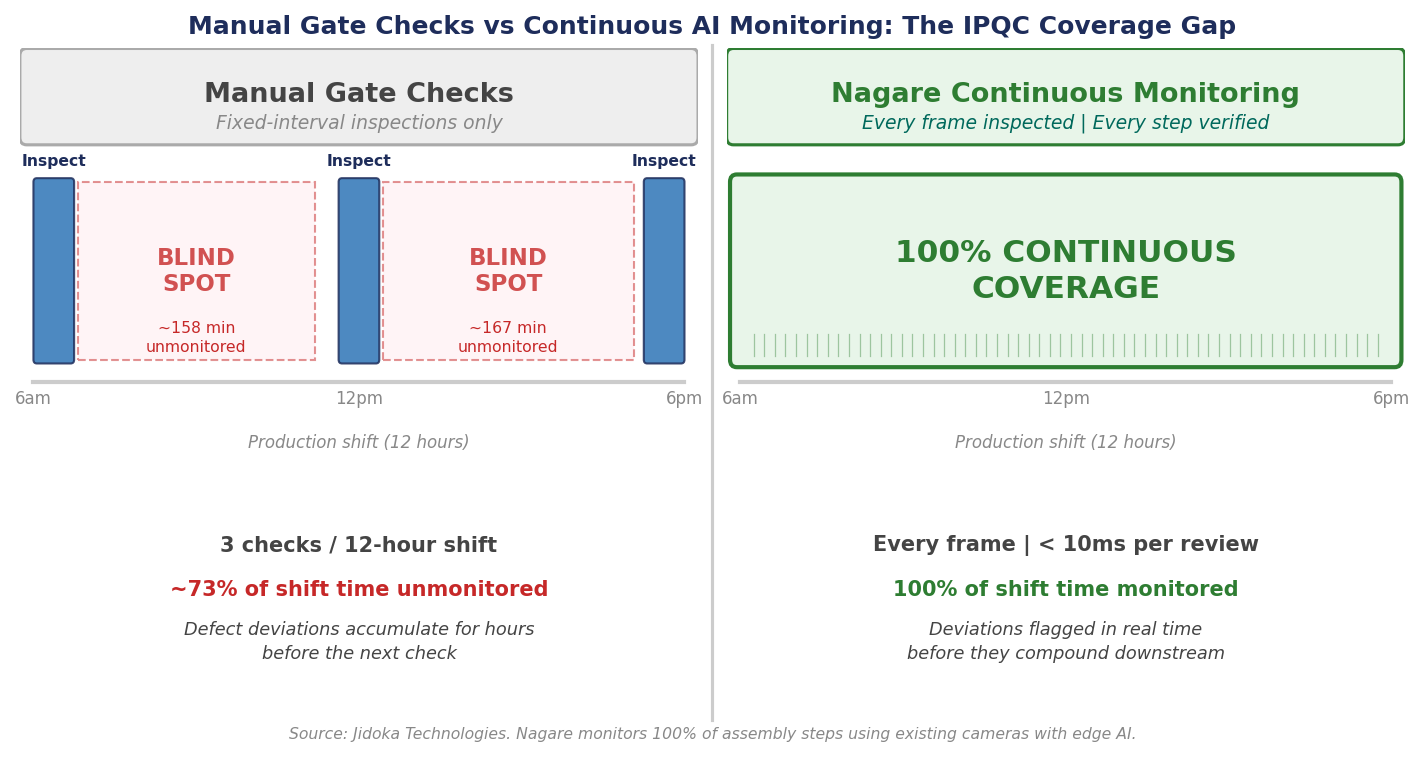
IPQC is where most mid-size manufacturers carry the widest blind spot in their product quality inspection framework. Gate-based manual inspection gives a quality reading at the moment of inspection. It tells you nothing about what happened in the three hours between checks.
An operator who skips a torque verification step at 9:15 am produces nonconforming subassemblies until the next gate check at 11:00. By then, 200 units may have moved forward. In deployments we have run with mid-size assembly facilities, this pattern is the single most common root cause of end-of-line rework clusters: not a single large deviation, but a small process drift that compounded undetected for one to three hours.
- Step #1: Check SOP adherence at each assembly step against digital or paper work instructions. For safety-critical or high-complexity steps, do not rely on operator recall. Physical or digital poka-yoke controls are the verification method, not the instruction.
- Step #2: Verify component presence, correct orientation, and torque value at each defined control point. Record torque readings for traceability. Replace any torque tool that has not been calibrated within its specified interval.
- Step #3: Monitor cycle time at each station as a proxy for process drift. Flag any station running more than 5% above or below standard cycle time for investigation. Consistent overage typically indicates a process problem; consistent underage may indicate a step being skipped.
- Step #4: Run First Article Inspection (FAI) at shift start and after any line changeover, material lot change, or tooling replacement. Do not release the production run until FAI records a passing result.
- Step #5: Record any operator skip, process deviation, or near-miss in real time. Escalate deviations above the defined threshold to the shift supervisor immediately. End-of-shift summary reporting is not real-time escalation.
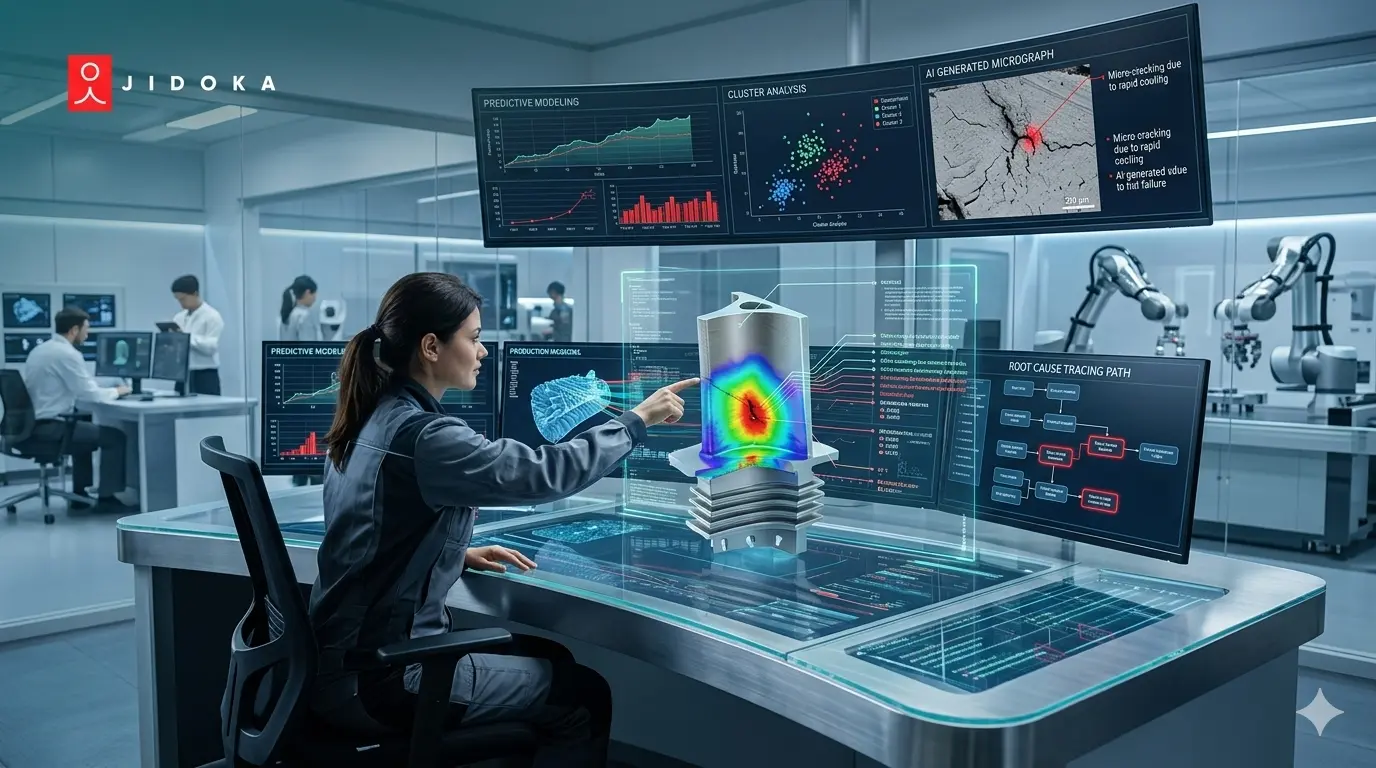
- Step #6: For 100% continuous qc visual inspection coverage, deploy AI process monitoring such as Nagare by Jidoka Technologies to verify each assembly step against digital SOPs in real time. This closes the inspection gap between manual gate visits without additional headcount.
“Nagare monitors 100% of assembly steps against digital SOPs in real time, cutting rework by 35% by catching deviations before they compound downstream.” - Jidoka Technologies
Stage 3 Checklist: Pre-Shipment Inspection (PSI)
PSI is the third stage of product quality inspection and the gate many buyers try to use as a substitute for upstream inspection. It is not. PSI confirms that production was executed correctly. When PSI is the only quality gate a buyer specifies, they are using a sampling check of finished goods to catch problems that IQC and IPQC should have stopped.
PSI defects carry commercial consequences that in-process defects do not. A finished product with a defect that ships to a customer triggers chargebacks, returns, and potentially market withdrawal. The pattern we observe in pilot-to-production transitions is that buyers who over-rely on PSI consistently pay higher rework costs per unit than those who invest in upstream inspection.
- Step #1: Confirm finished goods quantity against the purchase order, packing list, and production records. Do not approve dispatch of short or overrun shipments without written customer acceptance.
- Step #2: Draw an AQL random sample from the completed batch and run visual and functional inspection. Use the AQL level agreed with the customer, not a more permissive internal standard.
- Step #3: Check packaging integrity (no damage or contamination, correct seal), labelling accuracy (product code, batch number, country-of-origin marking), and barcode or QR code readability across the sample.
- Step #4: Verify that all compliance documents (test reports, certificates of conformance, regulatory declarations) are complete, attached to the lot, and match the shipment details. A shipment blocked at customs due to missing CoO documentation is a preventable PSI failure.
- Step #5: Test the product against customer acceptance criteria, not only internal quality standards. Where customer criteria differ from internal standards, always apply the stricter standard without exception.
- Step #6: Document lot disposition (accept, reject, or conditional accept) with the name, role, and date of the sign-off authority. Conditional acceptance without documented risk rationale and stakeholder agreement is not a valid disposition.
Stage 4 Checklist: Final Release and Quality Release Inspection
PSI and final release are not the same stage. PSI is AQL-based sampling of the finished batch. Final quality inspection (OQC or quality release) is the formal release authority confirmation that all inspection evidence across all four stages has been reviewed and meets acceptance criteria. Both are required. Conflating them is a compliance and commercial liability.
The release authority signature is not a rubber stamp on the PSI result. It is an evidence review. A production run can pass PSI sampling and still carry a quality hold if IPQC records show unresolved critical NCRs or if stage documentation is incomplete. The quality release inspection step has regulatory teeth in pharmaceutical, automotive, and food manufacturing: releasing without complete evidence is an audit finding, not a paperwork issue.
- Step #1: Confirm the IPQC data summary for the production run shows zero open critical nonconformances. If any critical NCR remains open, release is blocked until it is closed with corrective action confirmed or formally accepted with documented risk justification at the appropriate authority level.
- Step #2: Verify all NCRs raised at IQC, IPQC, and PSI are either closed with corrective action evidence or formally accepted with documented risk rationale and stakeholder sign-off. Unanswered NCRs are not eligible for release.
- Step #3: Review the PSI report and confirm lot disposition matches the acceptance criteria defined in the quality plan. A PSI conditional-accept without formal quality sign-off is not a valid release basis.
- Step #4: Obtain quality release sign-off from the documented release authority. Record name, role, authority level, and date. This record is the traceable authorisation for shipment and the first document requested in any customer or regulatory audit.
- Step #5: Update ERP and QMS with the batch release status and generate the Certificate of Conformance (CoC). Confirm that the CoC references the correct batch number, inspection standard, and release authority name.
File all inspection records from IQC, IPQC, PSI, and OQC per the traceability and retention policy. Minimum retention is the length of customer specification or regulatory requirement, typically 3-7 years for consumer goods and 10-15 years for medical or automotive applications.
“Quality release is not an inspection. It is a sign-off that all prior inspection evidence has been reviewed and meets customer and regulatory acceptance criteria.” - Jidoka Technologies
Where AI Monitoring Closes The Gap Manual Inspection Leaves Open
The four-stage product quality inspection model described here has a structural flaw that no updated procedure resolves. Every manual gate check creates a monitoring gap between visits. Process drift of 2-3% per shift compounds across a production run. A torque deviation that starts small becomes a defect cluster before the next inspector arrives.
The end of line quality check that PSI provides catches defects at the highest correction cost. By the time a nonconformance reaches PSI, it is assembled, packaged, and waiting. The question is not whether to run PSI. It is how to prevent defects from reaching PSI in the first place.
The Continuous QI Layer addresses this directly. The operational model: AI monitoring runs as a continuous background layer between each manual quality gate, providing 100% IPQC coverage without adding headcount. Existing IP cameras connect to an on-premises edge AI unit that runs each frame through trained inspection models in under 10ms. Every deviation is logged against digital SOPs, and alerts reach operators before the deviation has time to compound.
Nagare by Jidoka Technologies is built on this architecture. It verifies each assembly step at up to 12,000 parts per minute using existing cameras with no cloud dependency, keeping all inference data on-premises. Jidoka's KOMPASS integration reaches 99.8% accuracy in final inspection in quality control for visual defect detection. The commercial argument is straightforward: a 35% rework reduction in documented Jidoka deployments typically recovers the platform cost inside 12 months.
To see where your current inspection process carries the biggest unmonitored gap, request a Nagare deployment audit at jidoka-tech.ai. Jidoka's deployment team maps your existing camera infrastructure against your IPQC control plan and identifies the coverage gaps before any purchase decision.
Conclusion
The four-stage product quality inspection model exists because defects found early cost a fraction of what they cost downstream. IQC stops supplier problems before production begins. IPQC stops process drift before it accumulates into a defect run. PSI confirms the finished batch meets customer criteria. Final release authorises shipment with a traceable evidence record.
Most manufacturers apply this model manually and only at fixed gates, which leaves the in-process window largely unmonitored. Platforms like Nagare close that window by turning every existing camera into a continuous IPQC station. If your process relies on gate checks and end-of-line sampling, the gap between those checkpoints is where rework cost is hiding.
Request a Jidoka Technologies Nagare deployment audit to see it in your own facility.
Frequently Asked Questions
1. What is product quality inspection?
Product quality inspection is the systematic verification of materials, components, and finished goods against defined specifications at key production stages. It covers four main stages: IQC (incoming), IPQC (in-process), pre-shipment, and final release, each designed to catch different failure types at the lowest possible correction cost.
2. What is the difference between IQC and final inspection?
IQC inspects raw materials and components before production begins. Final quality inspection (OQC or quality release) is the end-of-process gate where the completed product is verified against customer acceptance criteria. IQC prevents defective inputs from entering production; final quality inspection confirms that outputs meet the standard before shipment. Both stages are required and neither substitutes for the other.
3. What does an in-process quality control checklist include?
An IPQC checklist covers SOP adherence, component presence and orientation verification, torque and fit checks at defined control points, cycle time monitoring, first-article inspection at shift start, and real-time escalation of any process deviation. AI monitoring systems such as Nagare can automate most of these checks continuously across 100% of production rather than sampled gate visits, closing the between-check blind spot that manual IPQC cannot address.
4. What is an AQL inspection level?
AQL (Acceptable Quality Level) is a statistical sampling standard that defines the maximum defect rate considered acceptable in a production lot. Common levels run from AQL 1.0 (tightest, used for critical components) to AQL 4.0 (most permissive, used for minor cosmetic items). MIL-STD-1916 and ISO 2859-1 are the most widely referenced AQL standards applied in product quality inspection and product quality control testing across manufacturing industries.